

PS: This is a read-and-practice article.

Some Background
Businesses are run by applications. A business suffers or ceases to exist if an application malfunctions. Previously, one could run one program on each server. The majority of applications operate on servers. Thus, every time an organization needs a new application, IT will go out and purchase a brand-new, highly resilient server. Due to the possibility that purchasing underpowered servers could prevent them from completing transactions, which could cost you money and customers, IT purchased faster servers than were required. A lot of servers were only using 5–10% of their capacity. It was a sad waste of resources and money for the company.
VMware introduced virtual machines, or VMs. It became feasible to use one server to run numerous apps. Whoa, that changes the game! However, there was a catch! VM needs a separate operating system. That is a serious drawback because:
Every OS uses RAM, CPU, and storage.
Every operating system needs to be patched, monitored, and licensed in some cases.
These all amounted to a waste of operating and capital costs. The remaining issues were:
A VM's boot time was slow.
It's more difficult than necessary to migrate and move virtual machine workloads between hypervisors and cloud platforms.
Containers arrived to address this. A single host's containers use the same operating system. The only problem is that companies like Google, Inc., and a few individuals made containers possible. For most enterprises, therefore, containers were out of reach.
That is the role that Docker, Inc. played. The term "Docker" can refer to three different things:
Docker, Inc. - Company.
Docker, the container runtime, and orchestration technology.
Docker is an open-source project (Moby).
In our context, and most often when techies talk about Docker, they are referring to the Docker engine, which is software that runs containers. And this, my friend, is the focus of our talk.
The Docker engine can be downloaded from the Docker official website or built from source on GitHub. It is available on Linux and Windows, with open-source and commercially supported offerings. Meaning, there are two versions of Docker:
Community Edition (CE)
Enterprise Edition (EE)
The CE edition is offered without cost. Similar to the CE version, the EE version offers access to additional products, including the Universal Control Panel and Docker Trusted Registry, as well as commercial support.
Install Docker on Linux
If you are on another system other than Linux, please use this link.
When you install the Docker desktop, it sets up the necessary components, including a VM, to provide a consistent Docker environment on your Linux. The virtual environment enables Docker to run containers in an isolated environment, separated from the host OS.
General Requirements
KVM support
64-bit kernel and CPU support.
At least 4GB RAM
Check if KVM modules are enabled.
lsmod | grep kvm
If your KVM modules are enabled, you will see something like this:

Else you can enable your KVM modules by running
modprobe kvm
Check ownership of /dev/kvm
ls -al /dev/kvm
If you have group permissions, you will see

If you don't have this permission, you can enable it by running
sudo usermod -aG kvm $USER
Be sure to sign out and sign in again, or just restart, for the changes to take effect.
After making your system meet the other requirements, we are set to install Docker. Click here to download Docker for Ubuntu. If you are using another system other than Ubuntu, follow this link.
cd into the directory where the .deb you just downloaded is found and run
sudo apt install ./name-of-file-you-just-downloaded.deb
Verify that your current user is part of the Docker group.
cat /etc/group | grep docker
If your current user is part of the group, you should see

The group name is : docker
x: means the group password is stored in the /etc/gshadow file
999: is the group ID (GID) for the Docker group.
sinke: is the list of users who are members of this group. Well, just one user at the moment.
Now check the version of Docker that has been installed.
docker --version
docker -v
The Big Picture

The picture explains what we are going to be doing from now on.
Ops perspectives
When we install Docker, we get two major components:
Docker client
Docker daemon (server or engine)
In a default installation, the client talks to the daemon via the local IPC Unix socket at /var/run/docker.sock
To test that the client and daemon are running and can talk to each other, run
docker version
If you see an error in the Docker component, it means your current user is not part of the Docker group, as shown above. Be sure to restart your system after running the commands mentioned in the installation process. However, if you just wish to continue now, you can run sudo docker version and you won't see any error in the server component.
Images
A Docker image is an object that contains an OS and applications. From a development point of view, the Docker image is just a class. To see all images running in your system, run
docker image ls
To get an image into a Docker host is called "pulling". To pull an image, run
docker image pull ubuntu:latest
Images contain just enough OS and the necessary dependencies and code to run the application it has been designed for.
Containers
We run containers from images.
docker container run -it ubuntu:latest bash
This takes you from your user's shell to the shell of the newly created container.
docker container run: tells the Docker daemon to start a new container-itflag: tells the daemon to make the shell interactive and attach the current shell to the shell of the new container.ubuntu:latest: tells Docker that the container should be based on ubuntu image we pulled earlier.bash: tells Docker that the process we want inside the new container is bash.
You should see something like below, after running the command.

Notice the new prompt. Inside this prompt run, ps -elf . Notice the result you get.

Now press Ctrl + P + Q to exit the container without terminating it. You should be back in your user's shell. Run ps -elf

Now see the number of processes running in your system. Do you notice the difference in the processes running in your container? Our container is still running. To see all running containers, run
docker container ls

The name of my container is 'relaxed_shannon'. What is yours?
To attach your shell to the running container, run
docker container exec -it your_container_name bash
We could also reference the container ID instead of the name. It works both ways.
To stop the container, run
docker container stop your-container-name
To delete/kill the container, run
docker container rm your-container-name
Verify that no container exists, run
docker container ls
Dev Perspective
In your terminal, run
git clone https://github.com/sinke237/docker-dev_perspective-nodejs-sample.git
npm init -y
npm install express
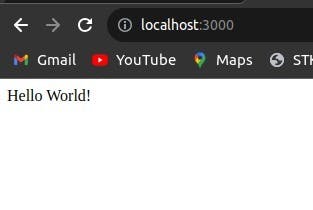
To check that all went well, run,node app.js then open your browser and enter the link localhost:3000 you should see

You should see this Hello World! message. Now you can proceed by going to the terminal, stopping the process, Ctrl+C
Now we are going to build an image from the Dockerfile. I am referring to the highlighted file below.

If you cloned the repo successfully, you should have all these files. Now let me explain the Dockerfile. First, cat this file by running cat Dockerfile
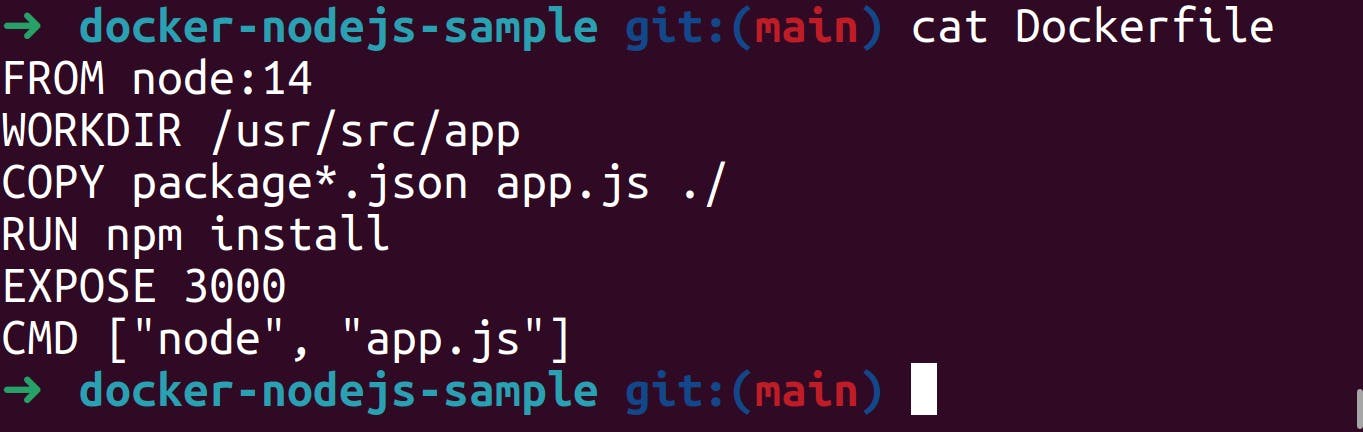
This is the content of the Dockerfile.
FROM: is used to get a Docker image from the Docker hub.
WORKDIR: The workdir is a sort of default directory for your application. All the commands will run from that directory.
COPY: Copies files from the current local directory to the WORKDIR
RUN and CMD: These are used to run commands.
EXPOSE: This exposes the port defined in app.js for mapping by the docker daemon
To build the image run,
docker image build -t give-your-image-a-name .
docker image build: creates a new image using the instructions in the Dockerfile.-t: is used to tag the image with a name.
To run a new container from the image, run
docker container run -d -p 3000:3000 --name give-your-container-a-name your-image-name
docker container run: starts a new container from the image-d: runs the container in the background (detached mode).-p 3000:3000: maps the port of the container to the port of the host. Note: I have defined the port of the container to be 3000 in the app.js file.--name give-your-container-a-name: sets the name of the container to give-your-container-a-name. Note: Replace this with what you want your container to be called.your-image-name: this should be the name of your image, it specifies that your container be created from this image.
Now go to the browser and enter localhost:3000 You should see,